AI Marketerプラグインでデータを保存・アクセスする方法
AI Marketerのプラグインでデータを保存するには、プラグインのコンテンツタイプを使用します。プラグインのコンテンツタイプは、他のコンテンツタイプとまったく同じように機能します。コンテンツタイプを作成したら、データとのやり取りを開始できます。
プラグイン用のコンテンツタイプを作成する
CLIジェネレーターを使用してコンテンツタイプを作成するには、ターミナルで次のコマンドを実行します。
- Yarn
- NPM
yarn AI Marketer generate content-type
npm run AI Marketer generate content-type
CLIジェネレーターは対話形式で、コンテンツタイプとその属性に関するいくつかの質問を行います。最初の質問に答えた後、Where do you want to add this model?という質問に対して、Add model to existing pluginオプションを選択し、関連するプラグインの名前を入力します。
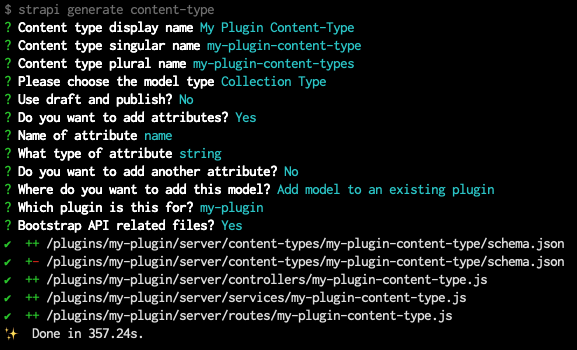
AI Marketer generate content-typeコマンドを使ってプラグイン用の基本的なコンテンツタイプを作成します。CLIは、次のようなコードを含むプラグイン用のコンテンツタイプを使用するために必要なファイルを生成します。
- コンテンツタイプスキーマ
- 基本的なコントローラー、サービス、およびルート
CLIジェネレーターを使用してシンプルなコンテンツタイプを最初に作成し、その後コンテンツタイプビルダーを使用してコンテンツタイプを編集することをお勧めします。
もしコンテンツタイプが管理パネルに表示されない場合は、コンテンツタイプスキーマのpluginOptionsオブジェクト内でcontent-manager.visibleおよびcontent-type-builder.visibleのパラメーターをtrueに設定する必要があるかもしれません。
プラグインコンテンツタイプを管理パネルに表示する:
次の例では、schema.jsonファイルの特定の行を強調表示し、プラグインのコンテンツタイプをコンテンツタイプビルダーとコンテンツマネージャーで表示可能にする方法を示しています。
{
  "kind": "collectionType",
  "collectionName": "my_plugin_content_types",
  "info": {
    "singularName": "my-plugin-content-type",
    "pluralName": "my-plugin-content-types",
    "displayName": "My Plugin Content-Type"
  },
  "options": {
    "draftAndPublish": false,
    "comment": ""
  },
  "pluginOptions": {
    "content-manager": {
      "visible": true
    },
    "content-type-builder": {
      "visible": true
    }
  },
  "attributes": {
    "name": {
      "type": "string"
    }
  }
}
プラグインのコンテンツタイプがインポートされているか確認する
CLIジェネレーターは、プラグインに関連するすべてのコンテンツタイプファイルをインポートしていない可能性があるため、AI Marketer generate content-typeコマンドの実行後に次の調整が必要になることがあります。
/server/index.jsファイルでコンテンツタイプをインポートします。/server/index.js'use strict';
const register = require('./register');
const bootstrap = require('./bootstrap');
const destroy = require('./destroy');
const config = require('./config');
const contentTypes = require('./content-types');
const controllers = require('./controllers');
const routes = require('./routes');
const middlewares = require('./middlewares');
const policies = require('./policies');
const services = require('./services');
module.exports = {
register,
bootstrap,
destroy,
config,
controllers,
routes,
services,
contentTypes,
policies,
middlewares,
};/server/content-types/index.jsファイルでコンテンツタイプフォルダをインポートします。/server/content-types/index.js'use strict';
module.exports = {
// 以下の行では、my-plugin-content-typeを実際の名前とフォルダパスに置き換えます
"my-plugin-content-type": require('./my-plugin-content-type'),
};/server/content-types/[your-content-type-name]フォルダに、CLIで生成されたschema.jsonファイルだけでなく、次のコードを含むindex.jsファイルが存在することを確認します。/server/content-types/my-plugin-content-type/index.js'use strict';
const schema = require('./schema');
module.exports = {
schema,
};
プラグインからデータとやり取りする
コンテンツタイプを作成したら、データの作成、読み取り、更新、削除が可能になります。
プラグインは/serverフォルダからのみデータを操作できます。管理パネルからデータを更新する必要がある場合は、サーバーから管理パネルへのデータ送信に関するガイドを参照してください。
データの作成、読み取り、更新、削除には、エンティティサービスAPIまたはクエリエンジンAPIを使用できます。特にコンポーネントやダイナミックゾーンにアクセスする必要がある場合はエンティティサービスAPIの使用が推奨されますが、基盤となるデータベースへの制限のないアクセスが必要な場合はクエリエンジンAPIが便利です。
エンティティサービスAPIやクエリエンジンAPIのクエリでは、コンテンツタイプ識別子としてplugin::your-plugin-slug.the-plugin-content-type-nameという構文を使用します。
例:
以下は、my-pluginというプラグイン用に作成されたmy-plugin-content-typeコレクションタイプのすべてのエントリを取得する方法です。
// エンティティサービスAPIを使用
let data = await AI Marketer.entityService.findMany('plugin::my-plugin.my-plugin-content-type');

// クエリエンジンAPIを使用
let data = await AI Marketer.db.query('plugin::my-plugin.my-plugin-content-type').findMany();
データベースには、middlewares、policies、controllers、services、およびregister、bootstrap、destroyライフサイクル関数からアクセスできます。